

Developer Portal
3 The Payment Manager Tool Bar
The payment manager tool bar manages all the functions you can perform on Payway Payment Manager. Depending on your security permissions, certain functions or features may not be available on the tool bar or sub-menus for a particular process.

The payment manager dashboard consists of:

3.1 Enter a Payment
The enter a payment function allows you to process a sale, authorize, or credit transaction. If any of these functions are not available check with your Company Administrator to validate your permissions.
The “Source” Drop down list defines the origin of your transactions. This list was provided by your Company Administrator to Payway during the setup phase. This list could be any label that describes the source(s) of your transactions. Each source can be linked to the same merchant account or have a unique merchant account. Consult your Company Administrator for how your merchants are configured.


*Required
To process a payment, select the appropriate source and enter all the transaction information. Although it is not required, it is highly recommended that you input the zip or Canadian postal code. If there is no zip code entry, the transaction will be charged the highest fees from the credit card association(s).
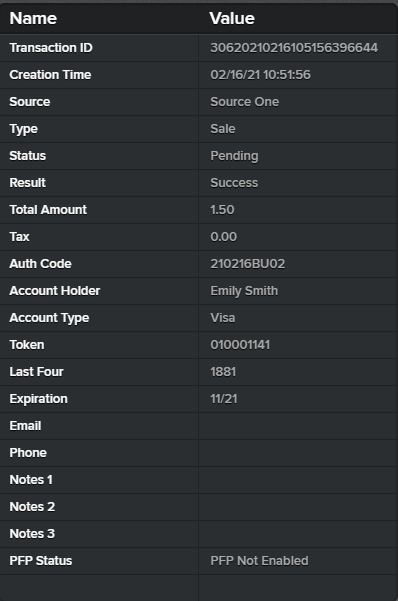
To process a sale, select “SALE.”
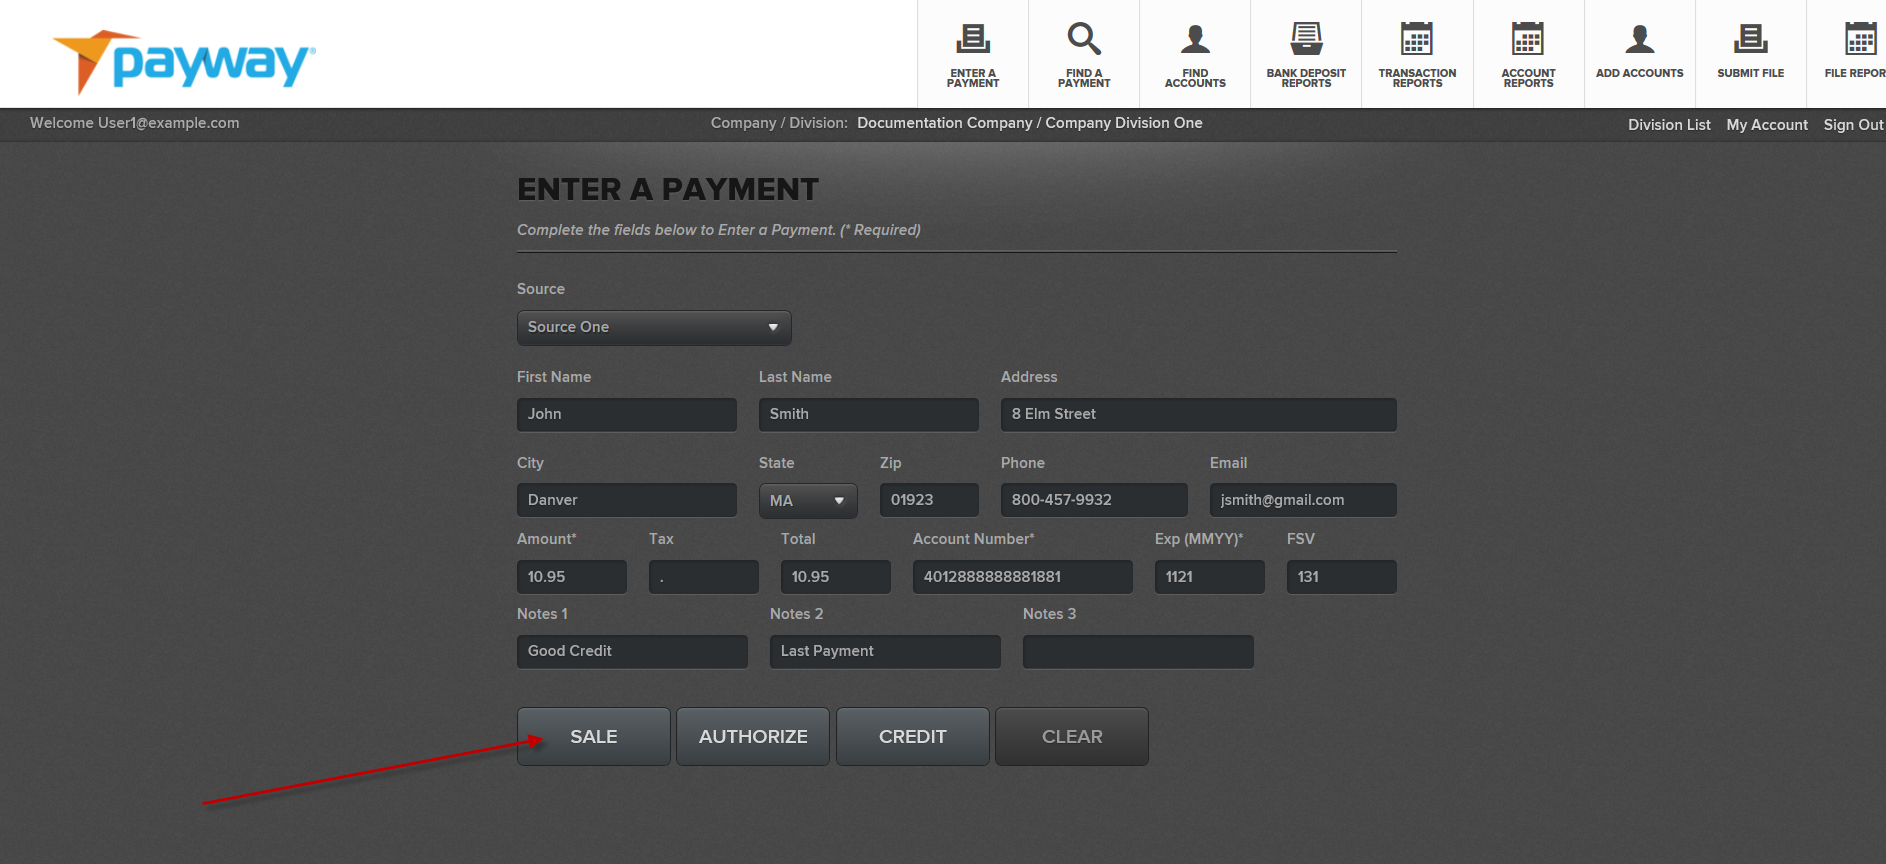
Payway will process the transaction and present a confirmation page.

* Contact Payway if you want discuss this feature.
** See Appendix A.
If you have permission to perform credits, select the “CREDIT” button.
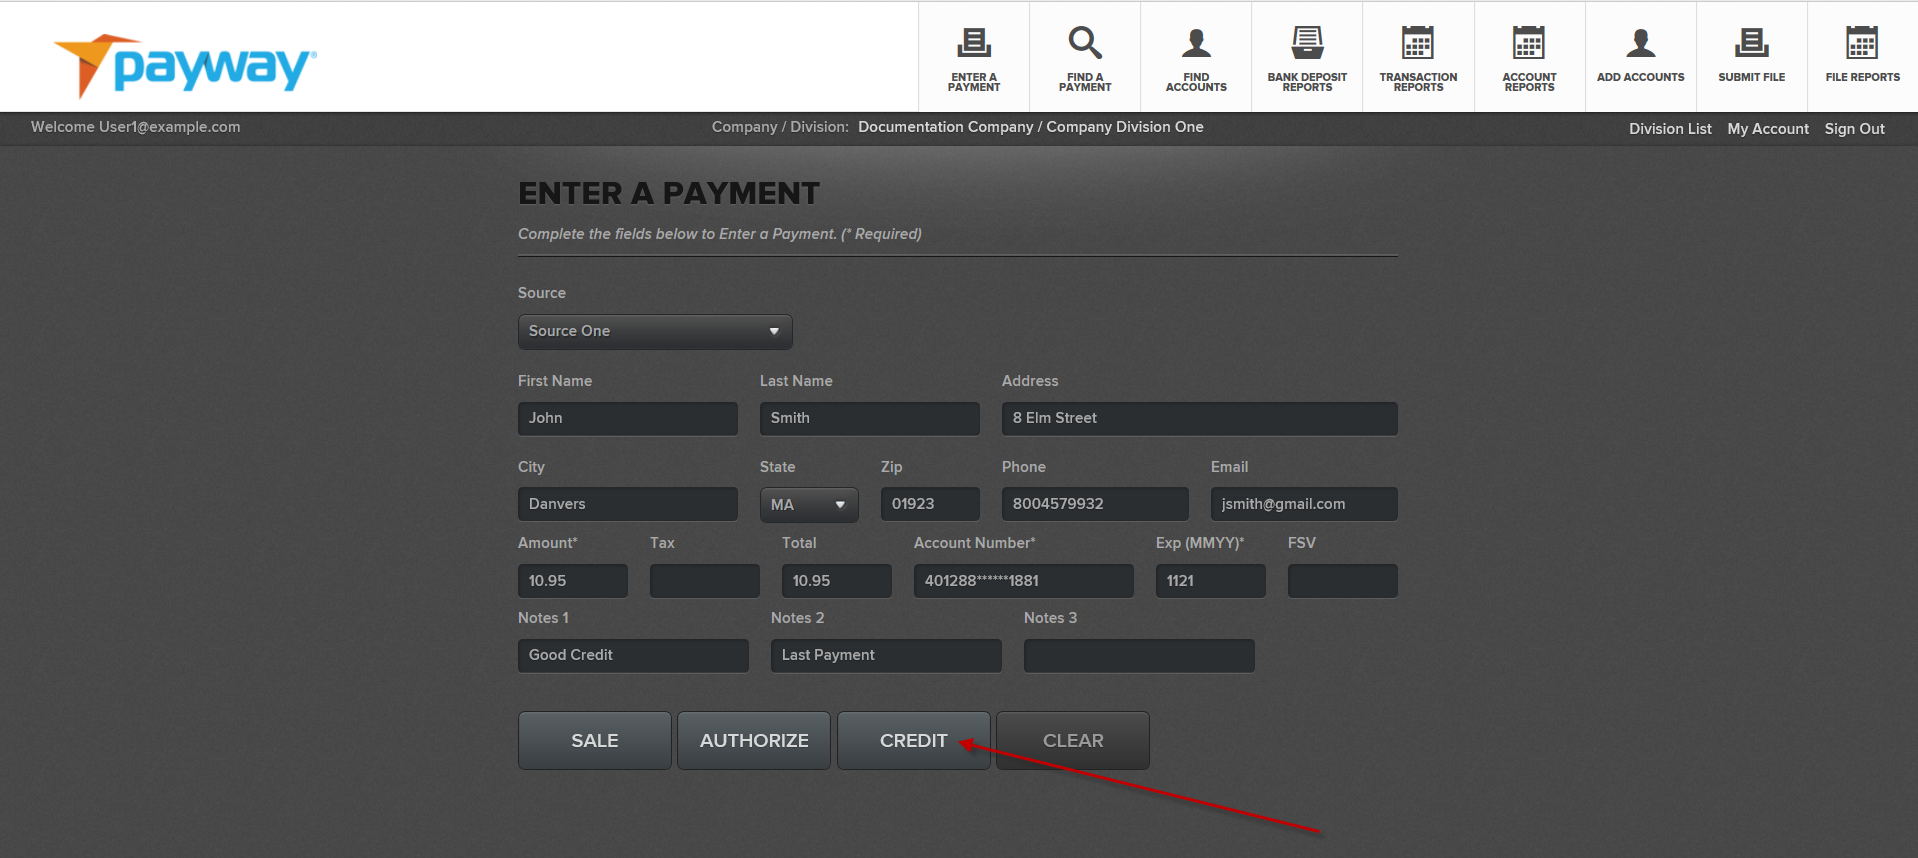
Payway will process the transaction and present a confirmation page.

Note that the “Type” is now credit. At this point you can select the “ENTER MORE” button to process more transactions or select the “Sign Out” link to finish your session.
Your system administrator has set a maximum credit amount you can process for each transaction in your security profile. If you exceed this limit, Payway will notify you of a permission error. Contact your Company Administrator.

The “AUTHORIZE” processing type is primarily for customers that process transactions that need to be authorized but captured later (e.g., for fulfillment applications).
This functionality is configured at the company division level and is set up by Payway for your company.
If this feature is enabled, select the “AUTHORIZE” button.

Payway will process the transaction and present a confirmation page.
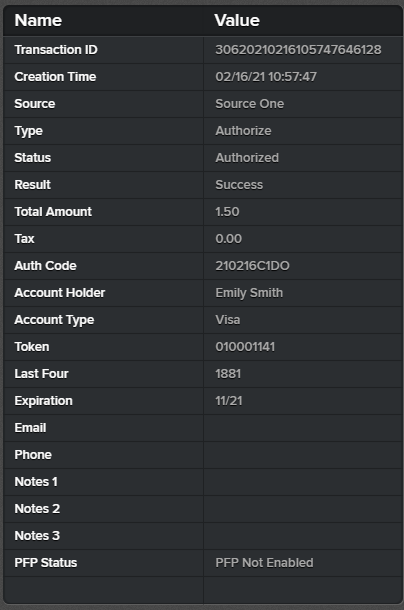
Note the type and status is “Authorized.” Capturing this transaction at a later time is done from the “Find a Payment” function.
3.2 Verify an Account
Payway provides the ability through the payment manager and by the Payway API(s) to verify a customer’s account for $0.00. This feature validates the customer’s account without performing an AUTHORIZE or SALE for a non-zero amount.
Contact Payway customer support to determine if this feature is supported by your processor. Additionally, “AUTHORIZE” functionality must be enabled by Payway to perform a verify only transaction.
Payway users must be granted permission to perform SALE transactions by their company administrator to access the “AUTHORIZE” button in order to perform this function.
To process a verify, select the appropriate source and enter the credit card number and expiration date. No other information is required; however, if the address and zip/postal code is entered, address verification results will get returned and are displayed in the Payway transaction report.
Enter $0.00 for the transaction amount.
Select the “AUTHORIZE” button.

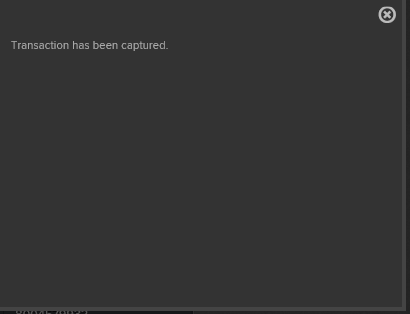
Payway will process the verify request and present a confirmation page. Note the Type is “Verify” and the Status is “Verified.” An authorization code will be generated to confirm success. If the verify fails, the Result will be “Declined.”
![]()
![]()
3.3 Find a Payment
The Find a Payment function allows you to research transactions that were processed on Payway and operate on them if necessary.
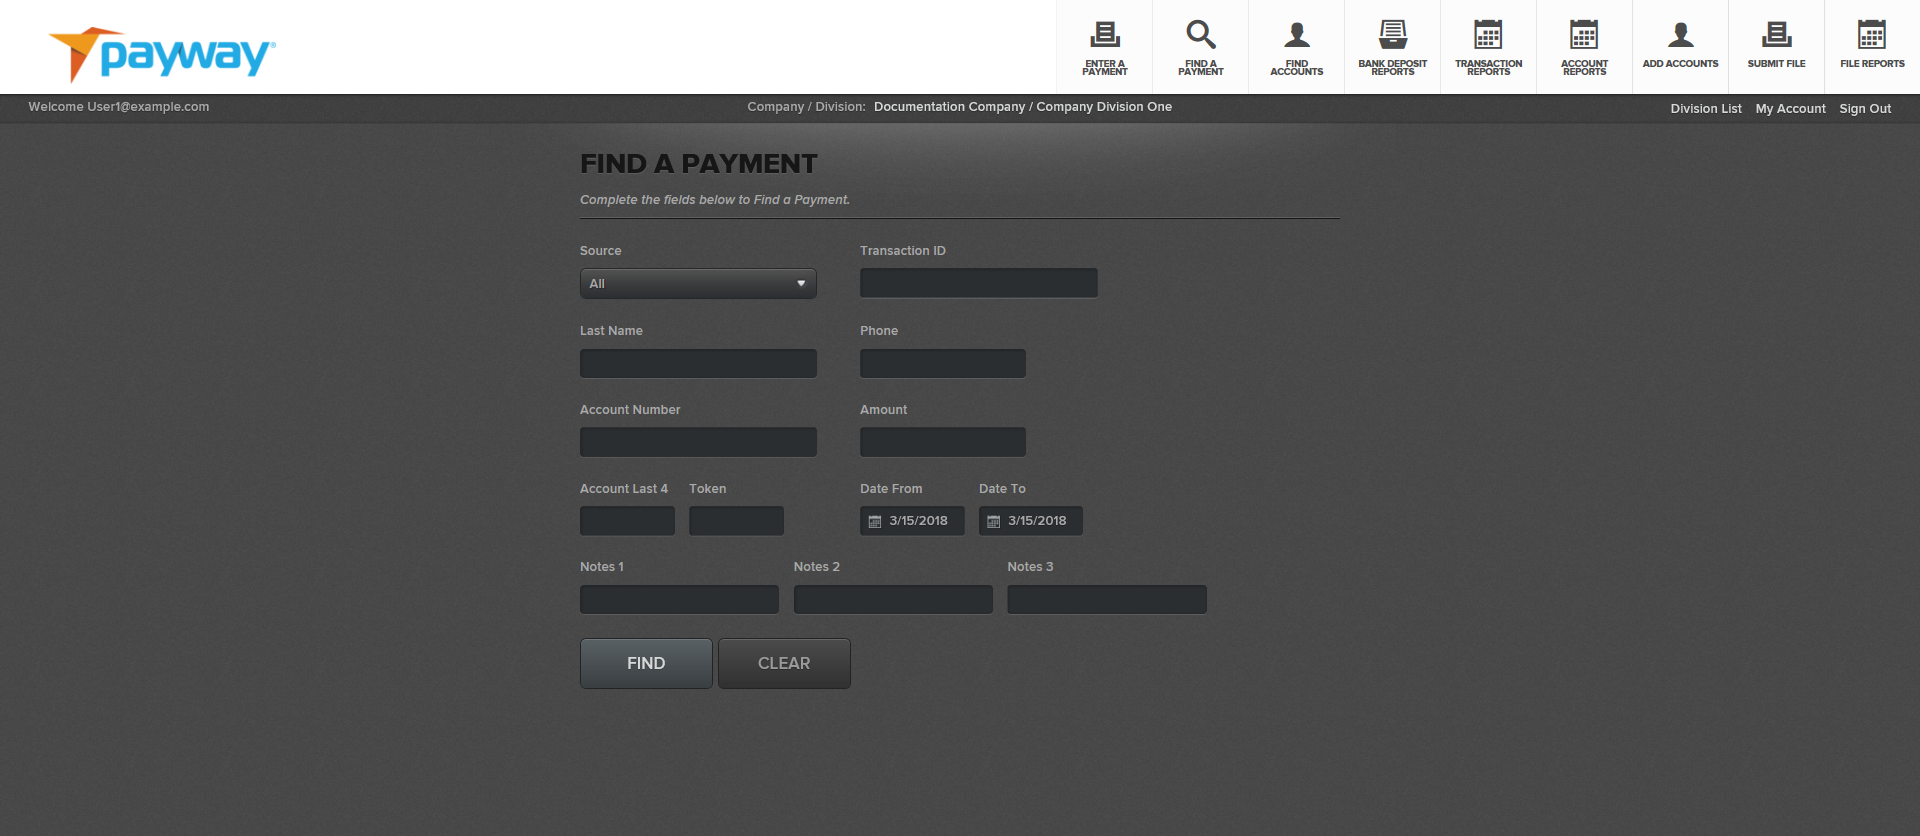
You can specify one to many selection criteria in order to narrow your search. All fields are wildcard implied with the exception of the Account Number and Token fields, which need to be the exact values.
In the following example, a partial Last Name and Notes 1 field were entered for the date range of March 15, 2018.

Payway returns a summary of all transactions that match the selection criteria.

At this point you can select the icon button to email a receipt to the customer.
++ See Appendix C for the Standard Receipt Template format. Contact Payway customer support to enable receipts from the payment manager and to define the receipt configuration.

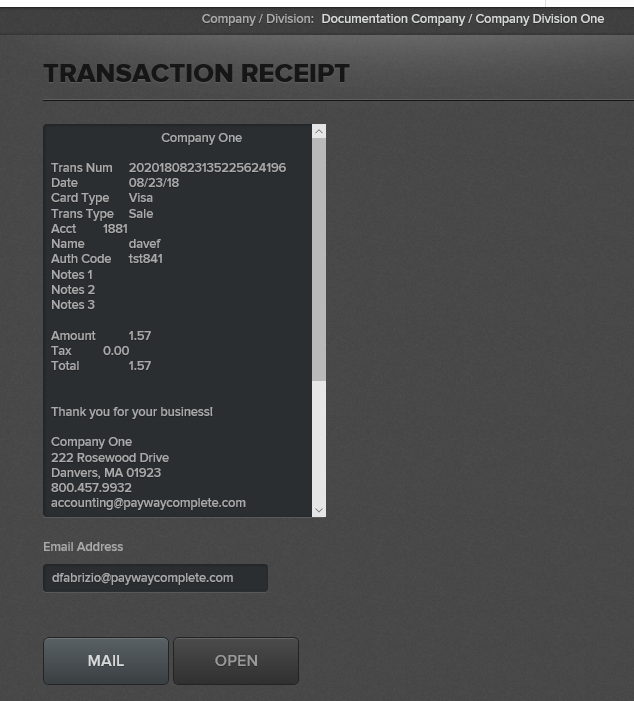
The Email Address will be pre-filled with the one that may have been associated with a transaction. If the Email Address is blank, or a different one is required, enter the new email address into the Email Address field and Select “MAIL”.
A window will appear confirming the email has been sent.

Close the window to return to the Transaction Receipt screen.
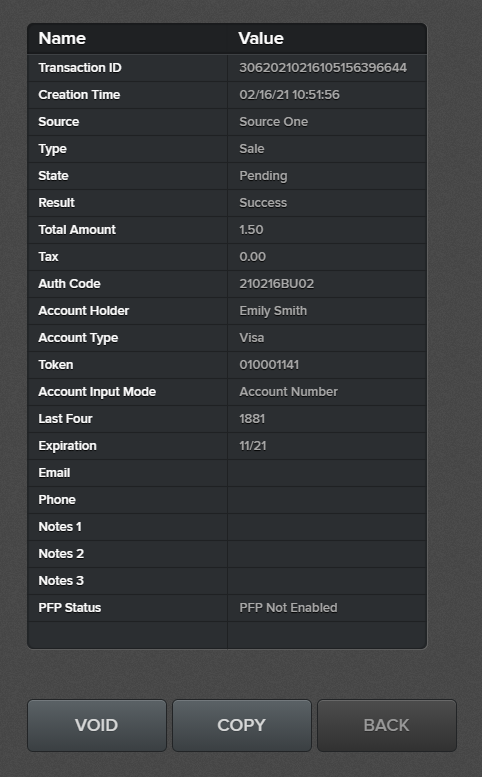
To view the details of a specific transaction, select the icon from the results screen.


* Contact Payway if you want discuss this feature.
**See Appendix A for Status and Type Codes.
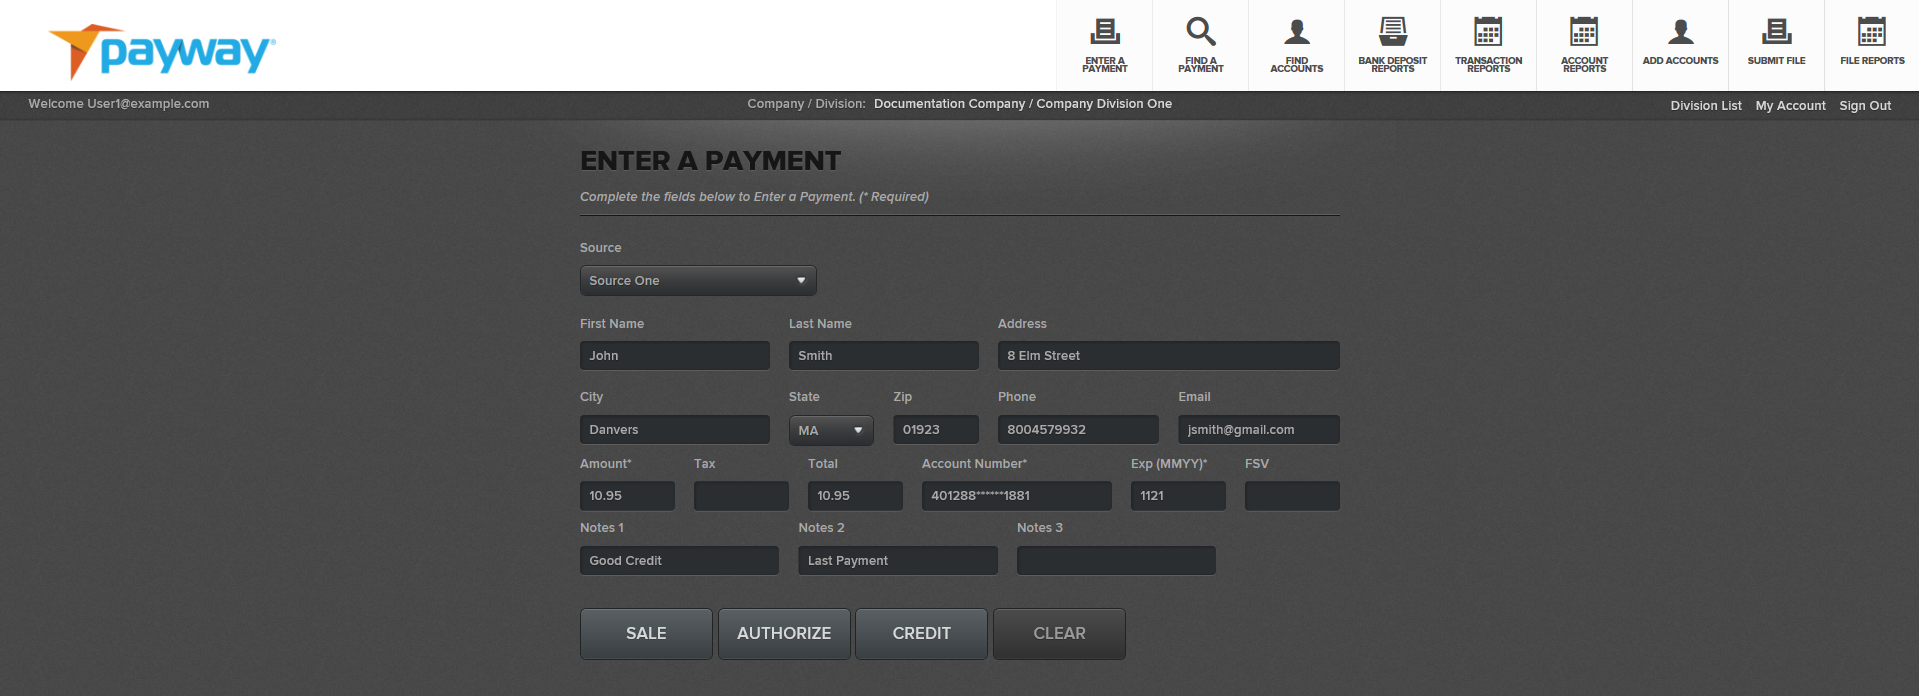
The “COPY” function pastes the information from the detail of this transaction into the “Enter a Transaction” screen in order to process another transaction on this account.
A receipt can also be created from the detail of the transaction by selecting the “RECEIPT” button.

The “COPY” function pastes the transaction into the “Enter a Payment” screen.

If you have permission to perform voids, a transaction can ONLY be voided if the status is pending or authorized.
To Void a transaction, select the “VOID” button from the Transaction Details page.
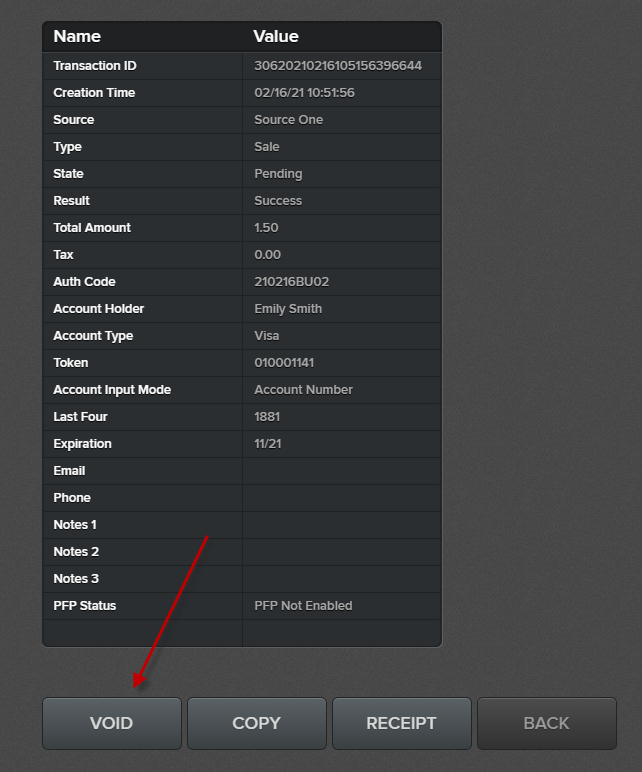
Payway will display a pop-up that the transaction has been voided.

Once the pop-up has been cleared, the State of the transaction will be changed from “Pending” to “Voided.”

A Void releases the Authorization hold on the funds in the customer’s account; however, settlement times may vary and is dependent upon on the customer’s credit card issuer.
In the special case where a transaction was authorized, but not captured, a “CAPTURE” processing button can be accessed by selecting the transaction detail on the summary page.
To capture a transaction that meets these criteria, select the “CAPTURE” button.

Payway will display a pop-up that the transaction has been captured.
Once the pop-up has been cleared, the Type is changed from Authorized to Sale and the State is changed from Authorized to Pending. The transaction is ready to be captured by the nightly settlement process.

To paste a transaction directly from the summary page into the “Enter a Payment” screen select the “+” icon.
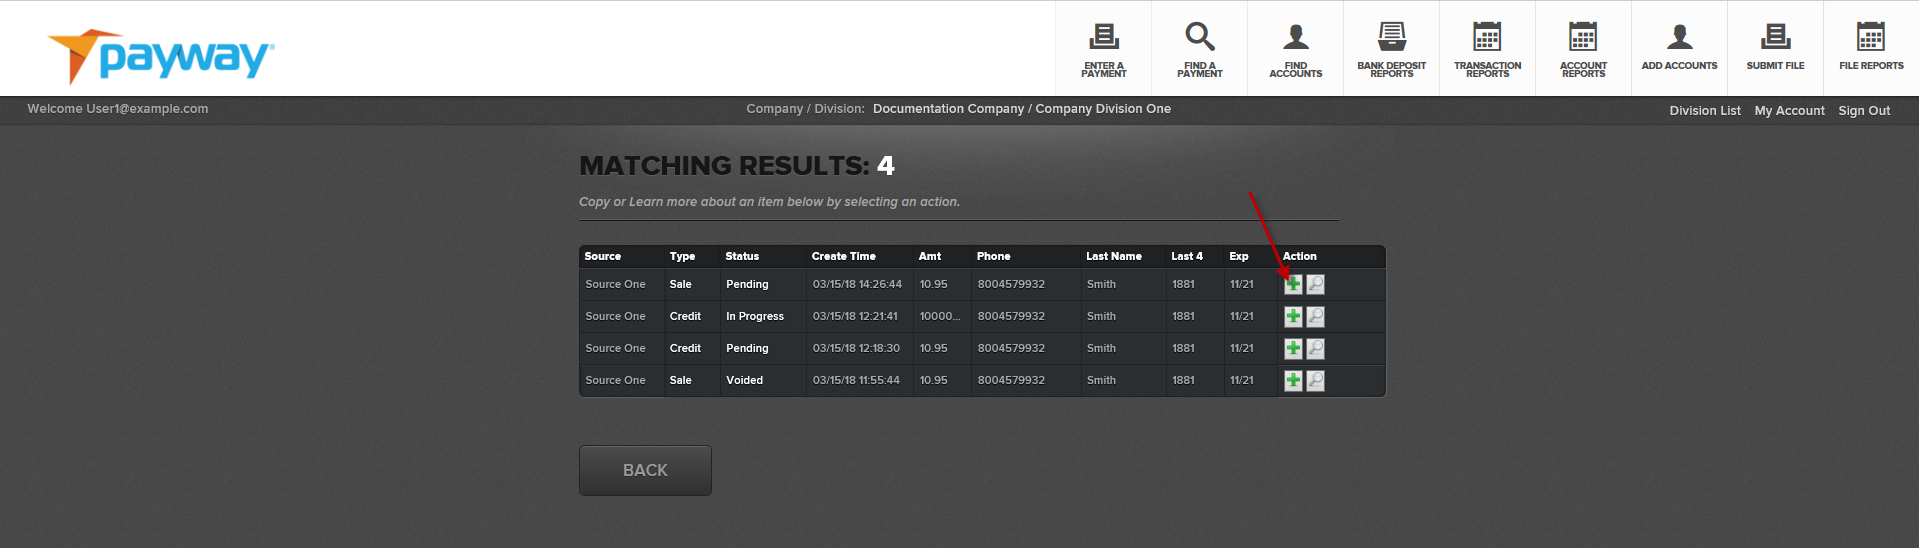
A copy of the account will be inserted into the “Enter a Payment” screen.
3.4 Find Accounts
The “Find Accounts” function allows you to research accounts that are in the Payway vault.


You can specify one to many selection criteria in order to narrow your search. All fields are wildcard implied except Account Number and Token which need to be the exact values.
In the following example, a partial last name and telephone number is entered.

Payway® returns a summary of all accounts that match the selection criteria.

From this summary screen you may operate on an account. Select the “Icon” to paste the desired account information directly into the “Enter a Payment” screen. Only the account information associated with the Payway® vault is copied. The amount field is empty.

From the summary screen, select the “Icon” to view the details of an account.

Select the “BACK” button to go back to the summary screen. Select the “COPY” button to paste the account information into the “Enter a Payment” screen.
Bank Deposit Reports
Nightly, Payway sends all pending transactions for settlement at approximately 10 P.M. Central Time. Once settlement is complete, Payway automatically creates downloadable reconciliation bank reports that are separated by each deposit for every merchant. By convention, Payway prefixes the label of each report by:
<Credit Network Name>-<Merchant Id>
Where the credit network name is:
- Paymentech (Chase Paymentech)
- FDMS (First Data Merchant Services)
- TSYS (TSYS Acquiring Solutions)

You can select all or an individual merchant account and/or a specific calendar date range. A summary page will appear that displays the merchant, date deposited, the net total for that deposit and the total debit and credit amounts.

To download a specific bank reconciliation report, select the “Download” icon. Payway® downloads the generated comma separated report which can be imported directly into Excel.

The header in the report will repeat the summary deposit.
![]()
![]()
The detail in the report is separated into the following columns:

** See Appendix A
+ See Appendix B
3.5 Transaction Reports
Payway provides the ability to manually run transaction reports. The output is in the same format as the bank reconciliation report except there is no header with the aggregate totals.
![]()
![]()
You can select all or an individual source and transaction status (See Appendix A) and/or a specific calendar date range. It is required that you specify a start date and end date.
![]()
![]()
The maximum allowable date range is three months.
![]()
![]()
Select the source, transaction status (See Appendix A) and the start and end date range.
Select “DOWNLOAD.” Once the popup displays, you can choose to open or save the file.
![]()
![]()
** See Appendix A
+ See Appendix B
3.6 Account Reports
The Account Reports function allows you to generate reports on accounts that have been updated by the Payway Account Updater feature (if purchased).

Select the “Report Type” drop-down and choose “Updated Accounts.” (The report type of “Expiring Accounts” is not implemented at this time.) Specify the appropriate output delimiter that is required for import into Excel, or any other system you are importing to. Specify the start and end range and select “DOWNLOAD.”

See the Account Updater Output File Format Specification for output specifications.
3.7 Add Accounts
If this feature is enabled on Payway®, you have the ability to store account information into the Payway® vault and assign a token.
Note that account number and expiration date are required. All other information is optional. However, it is highly recommended to include the zip or Canadian postal code to receive the best rates for fees from the card brands.
Enter all the relevant account information and select “ADD.”
A New Card Account Confirmation is displayed.


You can select “ADD ANOTHER” to continue or select a new operation to perform.
3.8 Submit File and File Reports
If this function is enabled, customers can upload a batch of credit cards or tokens from the Payway vault to process in real time.
This functionality is configured at the company division level and is set up by your Company Administrator.
See the Payway File Processing User’s Guide for complete specifications and instructions.