
Developer Portal
3 Four Integration Steps for Processing Payway Apple Pay
Processing an Apple Pay payment is done in four steps. The first step and the final step are executed from your server and are completed via PaywayWS requests. Step 2 and 3 are handled in the Apple Pay JavaScript. The steps are described in the sections below. Note that the first and last steps are executing from your server to the Payway® server. These steps include data that is not sent to the browser. During an Apple Pay transaction, only the transaction token, transaction result code, and any error message is available to the browser. The transaction token is described later in this section.
Below is a block diagram of the steps for an Apple Pay transaction. Note the two middle steps on the left side are initiated by the JavaScript that we provide for integration.
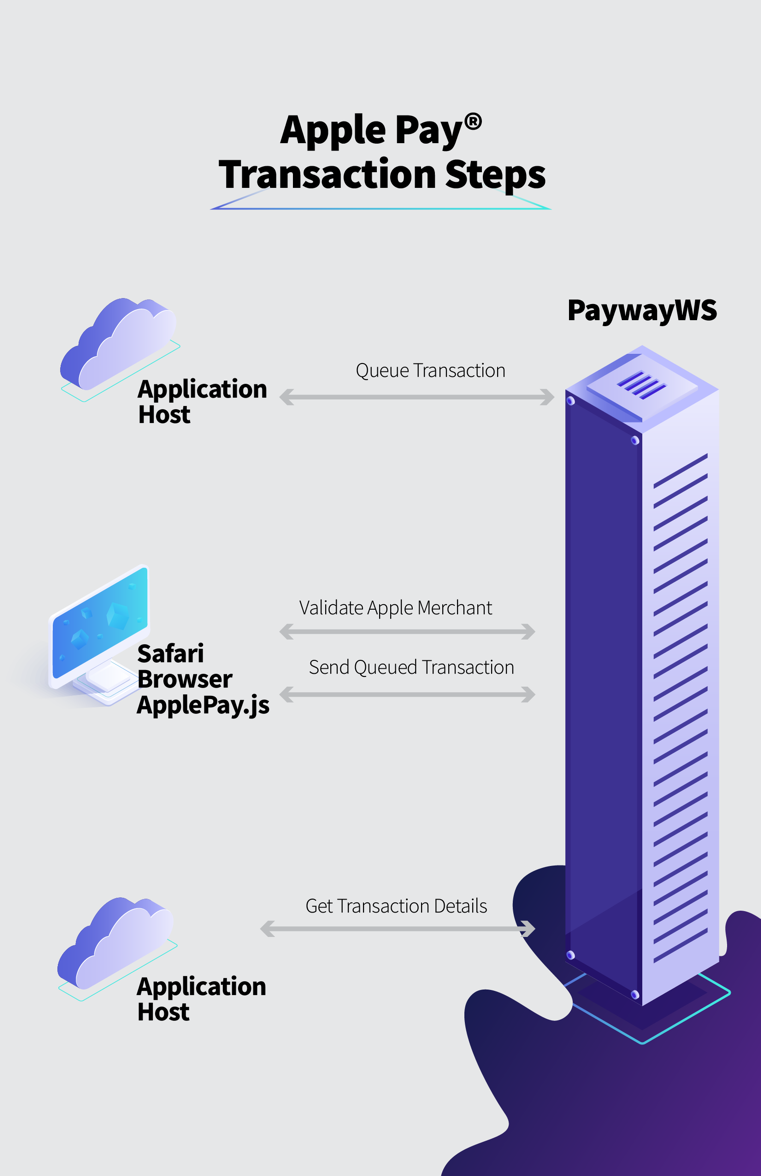
DO NOT EXECUTE STEPS 1 OR 4 FROM A JAVASCRIPT. THESE INVOLVE DATA THAT SHOULD NOT BE PASSING THROUGH THE CLIENT BROWSER.
3.1 Step One: Queue Transaction
Before presenting the page with the Apple Pay button, you will send PaywayWS a request to queue a payment. This request will return a paywayRequestToken that will be sent to the browser and used to complete the payment. The transaction token is like a PaywayWS session token except that it can be used only to interact with the queued transaction. This allows us to send to the browser this transaction token without concern for hijacking a Payway session. The queued payment includes the payment amount, source id, and payment type. Once this step is completed the Apple Pay button can be displayed on your page. See the PaywayWS integration guide and the sample application for more on sending the queue payment request. Note you should not send a paywaySessionToken to the web site; this can be accessed by the user and used for unauthorized transactions.
3.2 Step Two: Validate Apple Pay Merchant
When the user presses the Apple Pay button on your page, the Apple Pay payment sheet is displayed and a request is sent to PaywayWS to validate Payway® as a valid Apple Pay provider. The payment sheet is ready to accept payment authorization from the user.
3.3 Step Three: Authorize Apple Pay Payment
Depending on your customized modifications to the JavaScript, the user may interact with the payment sheet by modifying certain fields. When the user authorizes the payment, the JavaScript will send the encrypted Apple Pay information to PaywayWS for processing. The results are processed by the JavaScript. In the sample code, the JavaScript posts the results to a confirmation page. You will need to interpret the results and take appropriate action. Note that the JavaScript sends the transaction token to refer to the payment that was queued in step 1. Only the transaction token is available to the browser and the transaction token can be used only to send the queued transaction and read the results.
3.4 Step Four: Query Transaction Details
In response to the request to send the queued transaction (sendQueuedTransaction PaywayWS request), PaywayWS returns the result code and any error message. This may be all you need to complete the transaction. Optionally you can query the transaction details by sending a request to PaywayWS, getPaymentDetails. An example of this is in the sample application, the TransactionDetails.jsp page. This will return all fields for the payment and account records, with PAN data masked.
At this point you can store and/or present any of this information to the user for receipt purposes or other processing. This interaction is between your server and PaywayWS so none of this information is available to the browser during the transaction.